Connex-Electronics.com
Brady Identification Solutions
Brady TLS2200 Thermal Printing Systems

Brady ID Pal Portable Label Printer TLS2200 Printer System TLS PC Link Thermal Printing System
 Add TLS2200 to your Quote. Add TLS2200 to quote to see pricing.  Add TLSPC Link to your Quote. Add TLSPC to quote to see pricing.
     
  *** Free Ground Shipping in continental US for Brady TLS2200 Printers ***
 
TLS2200 Quickstart Guide
   
Step 1. Charge the Battery
  • Charge the battery pack for a minimum of 5 hours before initial use.
TLS2200 Quickstart Guide
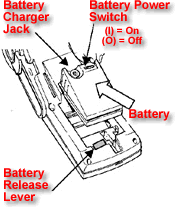
Step 2. Install the Battery
  • Turn the battery power switch to the off (O) position.
  • Slide the battery release lever to the unlock position (slide to left).
  • Drop the battery in as shown and slide forward.
  • Slide the battery release lever to the lock position (slide to right).
Step 4. Select Your Marker and Ribbon
  • Refer to the chart in the Users Guide to select the correct marker and ribbon for your task.
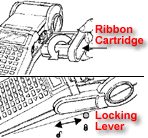
Step 5. Install the Ribbon Cartridge
  • Remove cartridge from the bag. Avoid touching or creasing the ribbon.
  • Remove any ribbon slack by rotating take-up spool end counter-clockwise.
  • Slide ribbon cartridge firmly into printer. (Locking lever must be in unlock position see below.)
  • Push the locking lever toward the back of the printer to close the print head and lock the ribbon cartridge in place.
Ribbon cartridge and locking lever
Step 6. Remove/Install Marker Roll
To remove a marker roll:
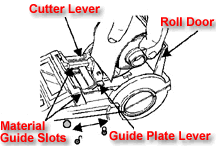
  • Cut off printed labels with the cutter lever.
  • Open the roll door.
  • Slide the locking lever to the unlock position.
  • Back the markers out of the material guide slots.
  • Pull the marker roll out of its cradle.
To install a marker roll:
  • Slide the locking lever to the lock position.
  • Turn the power switch on.
  • Open the roll door.
  • Pressing the guide plate lever down, slide and snap it into a notch that matches your marker roll width.
  • Making sure labels unwind from the top, snap the marker roll firmly into cradle.
  • Press <Enter> to clear the “ERROR No Label Present” message.
  • Feed leading edge of marker roll through the guide slots.
  • Press <Feed>. (Continue to manually push marker roll edge until it catches.)
  • Close the roll door.
TLS2200
Step 7. Create and Print a Label
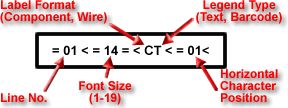
The status bar will be on the first line of the display. Refer to the Users Guide for further information on each heading.
display sample
  • Type text. Refer to the User’s Guide for guidelines on typing and editing text.
  • Press <Print> on the keypad to print your label.
  • To turn off the printer, turn the battery power switch to the off (O) position.