| Back to Main Brady Page | Quick-Navigate
Last Next | | TLS Printers | | TLS2200 Home | | TLS PC Link Home | | TLS Printer Labels | | Wire and Cable Marking | | Wire Markers | | Cable Markers | | Wire Marking Sleeves | | Data Communications | | Voice & Data Cable Id | | Workstation Labels | | Patch Panel Id | Rack, Bay, Frame,
& General Id | Fiber, Coax, &
Backbone Cable Id | | General Communications Id | | General & Industrial Id | | Rating & Nameplate Labels | | Permashield Labels | | Pre-Printed Labels | | General Industrial Labels | | Security Identification | | Security Labels | | PCB & Component Id | | Polyimide Labels | | Tedlar Labels | | Polyester Labels | | Vinyl Cloth Labels | | Laboratory Labels | | Centrifuge, Eppendorf, PCR Tube Labels | | Conical, Bottle, Petri Dish, Deep Well Plate Labels | | Vial, Tube Labels | | Vial Top Labels | | Slide Labels | | Well Plate Labels | | Straw Labels | | Bottle Tamper Seal Labels | | Printer Ribbons | | Printer Ribbons | | Printer Accessories | | TLS2200 | | TLS PC Link | | Software/Drivers | | Labelmark Software | | TLS PC Drivers | | Manuals | | TLS Operating Manuals | | TLS2200 Quick Start Guide | | TLS2200 Label Printing Guide | | TLS PC Quick Start Guide | | TLS PC Printer Setup | | | TLS2200 Printing Labels Guide | | | | The following tutorial demonstrates how easy it is to create, save, recall and print a list of labels on the TLS2200® printer. |
Step 1. Load your TLS2200 Thermal Transfer Printer. - Make sure your TLS2200® printer has a charged battery and is turned on. (Refer to the TLS2200® Quick Start Guide Steps 1 through 3.)
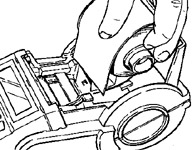
- Insert your ribbon (R6010 or R6210) and slide locking lever right to lock.
 | - Drop in your marker roll -- for this demo use part number PTL-19-423.
 | Step 2. Create and Save your list of labels. - Go to the Setup Menu by simultaneously pressing <Func>+<Setup>.
- Press the
 key three times to access the Style menu, then press <Enter>. key three times to access the Style menu, then press <Enter>. - Use the and
 keys to set the following options (press <Enter> after setting each option): keys to set the following options (press <Enter> after setting each option):
 - Press <Func>+<Exit> to return to the Text Editor screen.
- Press <List>.
- Press the key once to select Create, then press <Enter>.
- When "Enter List Name" prompt appears, enter MYLIST, then press <Enter>.
- When "Enter Part No." prompt appears, enter PTL-19-423, then press <Enter>.
- Press <Shift> + <Form Clear> to delete all lines of text and reset the font to the default value of 9.
- Enter EASY on line one.
- Press <Func>+<Save>. The Text Editor screen displays:
 - Press <Shift>+<Legend Clear>.
- Enter TO on line one.
- Press <Func>+<Save>.
- Press <Shift>+<Legend Clear>.
- Enter USE on line one.
- Press <Func>+<Save>.
- Turn the battery power switch off.
| Step 3. Recall your List. - Turn the battery power switch on.
- Press <List>.
- With the cursor on Select, press <Enter>.
- Use the and keys to select MYLIST, then press <Enter>. The part number appears, followed by the Text Editor screen:
  | Step 4. Print your List. - Press <List>.
- Press the key twice to select Print, then press <Enter>.
- When the "No. of Copies?" prompt appears, enter 1, then press <Enter>.
| |

 Add TLS2200 to quote to see pricing.